
My youngest daughter was at my house when the fabric for this arrived and asked what I was making with it. I told her "a filing cabinet". At her surprised look, I said "you think I'm mad, don't you?"
"Mmm, li'l bit" was the reply I got. So, there you are. Mad. But just occasionally, a little bit of madness helps create something that works - and here's my filing "cabinet"...
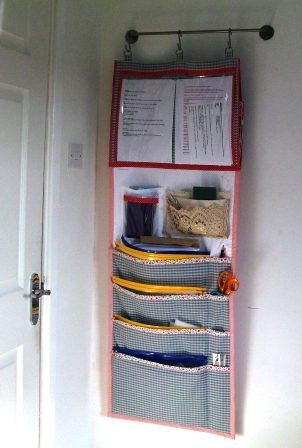
Actually, there's not much of the cabinet about it and it definitely takes up much less space than an actual cabinet. Filing pockets, rather than filing cabinet. I've started looking at wall space in a whole new light and a few more things along these lines may well be appearing soon!

the big filing pockets are deep and roomy, and the pockets to the side fit scissors, pens and pencils. The narrow bottom pocket is longer than the other narrow pockets and you may be able to see the top of two 12" rulers peeping out?
OK. Let's look a bit closer...

OK. Let's look a bit closer...

now you can see the tops of the rulers!
OK, I started out with:
- one metre of this blue check fabric from Abakhan - it's a lovely firm, heavy fabric, perfect for pockets without needing any lining.
- one metre of bleached calico - not so heavy but still quite sturdy, perfect for backing the pockets, especially with a little extra help (iron-on Vilene adds a little strength and stability) and for making smaller pockets.
- a metre of this clear PVC - you won't use anywhere near a full metre but it comes in handy for all sorts of projects, so it's a good one to keep in your stash (and it's really cheap!). It's perfect to make pockets for things you want to be able to see at a glance and you can stick post-it notes to the front of it!
- three metres of this gorgeous print bias binding. I didn't have enough (the project got bigger as I went along!) and I added some red spotty bias from my stash. The final count of bias is just over 5 metres.
- I also used pelmet Vilene, iron-on interfacing, D-rings, a bit of fabric that I'd valiantly hung onto for about 20 years and a battered old traycloth. This is one of those projects you can root around in your stash and include whatever you like. I think possibly the pelmet Vilene might really be the most important thing of all because it holds the whole thing flat. However, the iron-on interfacing is optional and really depends on the weight of your backing fabric and your confidence in it!
You can make this filing system to suit yourself - I need to organise the sewing patterns and craft projects I design for craft magazines, because I'm always working to deadlines and I need to know where the rabbit's ears are or the the instructions for the owl pincushion are at any one time.
I also need to remind myself of deadlines, each specific magazine's requirements for how the article is to be written, and my ideas. I already have pens, rulers and notepads everywhere, but another place where they're easily accessible is a help in making me feel organised (even when I'm not really).
I'll give you the measurements I used, because you can see from the photos what fits in them, and you can maybe make it smaller or larger for your own needs. The zipped wallets you can see peeping out measure approx 37cm x 29cm (14" x 11").
Most of the pockets aren't gusseted, because I don't need to stuff huge wads in there. If they were gusseted, I probably would stuff huge wads in there and it would just turn into a wall version of my cupboards, drawers and stash boxes, wrecking my chances at this whole idea of being organised. Oh, I know me so well!! They still fit more than I expected, though.

Instructions:
In this cutting list, I've mentioned the fabric I used to make things clearer and in case you want to make an exact copy! Follow the links above for the fabrics. The red stripe is an old fabric, but there has to be something similar for sale somewhere!
Cut:
- white calico backing fabric 50cm x 100cm
- pelmet Vilene 50cm x 100cm
- iron-on interfacing 50cm x 100cm (optional)
- red stripe: 56cm x 106cm - this one will be used as a fold-over binding too, so it will show around the front edges as well as being the final backing piece showing from behind
- blue check: 4 pockets measuring 50cm x 28cm each
- blue check: 1 piece of fabric measuring 50cm x 76cm (this will be folded in half to make the top piece)
- Cut 1 piece of PVC measuring 45cm x 32cm (this will become the top pocket where you can stash 2 x A4 sheets you want to be able to see at a glance)
- 1 piece of PVC for small pocket: 21cm x 16cm
- white calico for small pocket: 24cm x 22cm
To Make:

Sew bias binding along the tops of the 4 large pockets. I used a slightly different method to the usual, which makes the most of the lovely print: pin one side of the bias onto the back of the pocket, wrong sides facing. Zigzag in place.

Fold the bias forward and stitch into place using straight stitch.

Iron the interfacing onto the calico backing fabric. Sew the pockets in place on the front of the calico backing fabric. Place the first pocket 38cm from the top edge. Sew around three edges of the pocket.

There's no need to neaten - unless you want to zig zag across the bottom edge of each pocket for strength (or OCD-related reasons!). The seams will all be hidden.
Place subsequent pockets 13cm lower, each pocket overlapping the first, until you've sewn four pockets in place. The bottom pocket should be flush with the bottom of the backing fabric.

Make smaller pockets on the right hand side of each of the big pockets by sewing right down the pockets, and across where the pocket needs to be shorter (I left a long pocket at the bottom for rulers, and the otthers are shorter for pens and scissors).
Don't skip this stage - these pockets are proving really useful to me and I'd guess they might to you too.

create the smaller pockets with stitching
the dark dotted lines are the stitching lines
Fold the check fabric measuring 50cm x 76cm in half (making a piece 38cm x 50cm) and press. Open out and sew bias along the two long edges. Sew a channel along the folded edge if you plan to hang it on a dowel (I did this then changed my mind and added tabs - these are optional, you can add them now or later).

Sew bias binding in place below the channel (top edge only as shown in above photo) to hold the PVC pocket in place. Fold under both ends, matching the length of the bias to length of PVC.
Sew bias onto the two shorter edges of the PVC, enclosing the raw edge.
Place the PVC pocket in position underneath the bias and stitch along the bottom edge of the bias to secure, holding the top of the PVC pocket in place. The sides of the pocket remain open, not the top.
Stitch bottom of PVC down - this edge will be covered later when you join the top to the bottom and add thr bias to cover both the seam and the bottom of the PVC. You'll also notice there's another side pocket too - the folded piece has created a pocket you can stash magazines or folders in.

Sew a small pocket from PVC - fold over the top of the PVC and cover the raw edge with bias. Hem the white fabric along the top edge. Pop the PVC pocket centrally onto the white fabric and turn over the three raw edges twice (to the front) to form a hem and enclose the PVC all in one, and sew in place close to the fold.
Sew the whole pocket onto the backing close to the edge of the pocket.

If you have one lying around (and I know I'm not the only one who has squirrelled things like this away!) make a pocket from an old traycloth just by folding and stitching into place around three sides.

Back the whole of the main pocketed area with pelmet Vilene and then place centrally on the final backing piece. Turn the edges over to the front twice and press. Sew along the edges to create a hem and binding.
Sew the bottom part of filing pockets to the top part, right side to wrong side (flat). Cover the resulting join on the front with a piece of bias and turn under at the ends. This bias should also enclose the bottom of the large PVC pocket.
If you didn't add tabs before, you can add them now. Place a D-ring in the tab before attaching if required. For my tabs, I used fabric measuring 10cm x 8cm for each tab. I folded in half lengthwise, folded under 1cm on each side and stitched along the length to enclose the raw edges, then attached to the filing pockets with secure stitching.
Fix the dowelling or pole to the wall - mine is an IKEA Bygel rail with Bygel hooks. Bizarrely, this pole has been sitting under my kitchen sink for about three years. It's about time it started earning its keep!
If I had realised I was going to use it, I may have made the channel at the top wider so it could be slid over the end pieces. However, this way it can be easily removed for washing.

Enjoy being organised! Ahem. Maybe.
The fabrics I linked to above were kindly given to me by Abakhan fabrics to use in this tutorial.
13 comments:
This is fantastic! I have a pretty small workroom and run out of space for storing things, so what a fab idea to use the walls too :-) (I currently use the floor, which isn't such a good idea...).
Glad you like it! It seems a bit silly having bare walls when the shelves are full to bursting. Yes, I've been known to use the floor too. And the sofabed that resides in my sewing room!
Great project Wendy! I must get organised, I'm such a messy crafter. Thanks for the inspiration"
The guy who did my MOT misspelt my surname as Messy (it's Massey). OH said it was spot on...
So much nicer than the ready-made plastic hanging organisers and probably a lot cheaper too.
It's a good idea for anyone not just those with small spaces.
Looks very good and sturdy for all your paperwork - like the idea of see through pocket!
I love this idea. I, too, have literally covered nearly every square inch of my sewing room with all of my crafting paraphernalia. I was lucky enough to find peg boards in second hand shops for organizing. But, I think I have a bit more wall space for one of these. Thanks for the really well written tutorial.
Debbie....(0;
<><
brilliant! will defo have to make one!
Problem solved! I usually have a 'few' project going at the same time and I will invariably misplace the instructions / pictures. I don't even want to thing about how often I've reprinted something, just to discover the originals later... Definitely will be making this - probably today. Thanks so much for sharing.
I can already see a few of these hanging from the rafters in the basement! I don't have luxury of walls😅
Thank you so much for thus tutorial. It's just what I need.
love your ideas! Great tutorial
Love your ideas but I’m to old to learn the metric system so could you please make notes in inches I would like but don’t know what a meter is thank you jeanette
Post a Comment