A big thank you to everyone who entered the giveaway here - there was a copy of The Crafter's Guide to Taking Great Photos up for grabs!
The entrants' names all went in a hat and I'm pleased to report that we now have a winner..
...is a drum roll a bit too dramatic here...?
Mythillogical
...cue clapping and cheering...
A brand new copy of the book will be winging its way to you just as soon as I get your address and can hotfoot it down to the post office. I really hope it's a big help in improving the product shots!
Thanks once again to everyone who entered. There will be another book giveaway before too long, so do watch out for that!
Tuesday, 16 October 2012
Sunday, 14 October 2012
Handmade Monday 88
Hello and welome to Handmade Monday.
If you're reading this, it's because my computer is still away being mended and I don't have any access to it. I'm scheduling this post while my son stands here waiting to take it away for repair!
So, I'll be back just as soon as I can to check out your links. In the meantime, talk amongst yourselves...
PS: I'm back!! Thank you for your patience! If you missed it, there's still time to enter my giveaway!! I'll be drawing the winner Tuesday afternoon (tomorrow!!) so you have until noon tomorrow (UK time) to enter. Good luck, and I'll be blog browsing later once my backlog of work is cleared a little bit!
If you're reading this, it's because my computer is still away being mended and I don't have any access to it. I'm scheduling this post while my son stands here waiting to take it away for repair!
So, I'll be back just as soon as I can to check out your links. In the meantime, talk amongst yourselves...
PS: I'm back!! Thank you for your patience! If you missed it, there's still time to enter my giveaway!! I'll be drawing the winner Tuesday afternoon (tomorrow!!) so you have until noon tomorrow (UK time) to enter. Good luck, and I'll be blog browsing later once my backlog of work is cleared a little bit!
Friday, 12 October 2012
Tea and a Chat with Rosiepink Studio
Today I'm chatting to Annie and Lyn, who together make up Rosiepink. Their felted artwork looks delightfully colourful, tactile and full of life. Join me while we find out more...
Hello! Good to see you, the kettle’s just boiled – what would you like to drink?
Hello Wendy! Two mugs of Yorkshire tea please, with milk but no sugar.
So, tell us a bit about yourself and your business.
‘Rosiepink’ is me, Annie, and my mum, Lyn, working together as textile artists, but we both also work outside our studios - I work in I.T. in Bournemouth and mum works in a library in Southampton.
We both love working with textiles, handmade felt in particular, and our business now centres around the sale of our ebook (pdf tutorial) ‘Creating Felt Artwork’. We’ve started planning our next project, which will be a natural development from the first.
What inspired you to start your creative business? How did it all begin?
We’ve always been creative and we like to learn new skills, so about six years ago, we went to a one-day felting workshop and by lunchtime we were fascinated by felt! We came away having made pods and small bags and couldn’t wait to make more. We quickly ordered some wool and set to in the kitchen practising making felty goods and over time we started to sell in a local gallery. To cut the cost of the raw materials and generate income, we bought wool in bulk. We sorted the wool into small packets to sell and had the advantage of getting our own wool at a better price. At the same time, we discovered the joy of hand-dyeing scrim. We wanted to use some in our work but the majority was sold, in pretty bundles, on Etsy.
How has your business changed and developed since it started?
We started out with the idea of making felted items to sell. As we worked, the items became adventurous, larger and more decorative, and making felted art was a natural progression from that. Felted art is popular and we received requests, through our blog, for workshops to teach how to make it. Many requests came from abroad so we decided to write a step-by-step guide to making felted art that would be like having a workshop in your own home. We chose to sell the ‘book’ as an instant pdf download to make it quick and easy for customers to receive - no matter where they live.
What are the main ways you promote your business? Which methods have been the most successful for you?
Our blog is our most successful promotion of our business. We believe that if a customer can see some of our work, learn a little about us and perhaps try out our free tutorials, then she will have confidence in our pdf ‘Creating Felt Artwork’.
We’ve written articles for felting, stitching and crafts magazines and there’s always a rush of interest in our blog from those.
We also sell on Etsy and Craftsy.
What’s your workspace like? Can we have a sneak peek? And do you have any workspace organisation tips for the rest of us?
We both have a dedicated craft room in our own homes. The essential bits of kit common to both rooms are: stash, felting/project table, sewing table, computer and desk, camera and good room lighting.
The hardest part of any project is the actual starting, so don’t put essential equipment away.
Set your sewing machine up on its own table so that you just have to sit at it to start sewing. Have your sewing requirements, such as threads, close to hand and neatly organised so that you don’t waste time searching for something.
Set up a dedicated table for ‘work in progress’ so that you don’t have to pack it away and so that you can easily work on your project in even just a few spare minutes. It’s also good to be able to just look at your project from time to time so that while you’re doing other things you can mull over ideas.
Keep a notepad handy and jot down any ideas you have - if you don’t they can just evaporate!
Tidy up and sort your stash now and again, not only because it makes life easier, but also you can forget what you have and sometimes just sorting through it is inspiring.
What other small (or not-so-small) creative businesses do you admire?
Sara's Texture Crafts - Sara always seems happy and enthusiastic about her passion for fibres and offers free advice along with her wares. Her stock is varied, colourful, good quality and fairly priced.
What tips can you give to others who run (or hope to run) a small creative business?
The most important thing is to be passionate about what you do, then it’s as much joy as it is work and far more likely to succeed.
A business needs to make a profit, so calculate all your costs carefully before you decide on a selling price.
Register with HMRC as soon as you start trading and keep accurate records of all money in and all money out - then you need never fear the taxman.
Keep an open mind to different ideas and always be prepared to change direction if necessary.
Set goals. If you want to launch a new product every six months, then you have to work out what steps you will need to do, and when, to accomplish that. Nothing happens if you just have a vague idea of what you want.
What are your hopes, plans or ambitions for the future?
We’d both love to be full-time textile artists.
Finally, where are the places we can find you online if we want to partake in a little friendly cyber stalking?
Please drop in to our blog www.rosiepink.typepad.co.uk where we occasionally talk about what we’re up to and where we share free felting tutorials.
Thanks so much for stopping by – it was so nice to be able to take the time to chat with you!
Thank you for inviting us in Wendy.
Hello! Good to see you, the kettle’s just boiled – what would you like to drink?
Hello Wendy! Two mugs of Yorkshire tea please, with milk but no sugar.
So, tell us a bit about yourself and your business.
‘Rosiepink’ is me, Annie, and my mum, Lyn, working together as textile artists, but we both also work outside our studios - I work in I.T. in Bournemouth and mum works in a library in Southampton.
We both love working with textiles, handmade felt in particular, and our business now centres around the sale of our ebook (pdf tutorial) ‘Creating Felt Artwork’. We’ve started planning our next project, which will be a natural development from the first.
What inspired you to start your creative business? How did it all begin?
We’ve always been creative and we like to learn new skills, so about six years ago, we went to a one-day felting workshop and by lunchtime we were fascinated by felt! We came away having made pods and small bags and couldn’t wait to make more. We quickly ordered some wool and set to in the kitchen practising making felty goods and over time we started to sell in a local gallery. To cut the cost of the raw materials and generate income, we bought wool in bulk. We sorted the wool into small packets to sell and had the advantage of getting our own wool at a better price. At the same time, we discovered the joy of hand-dyeing scrim. We wanted to use some in our work but the majority was sold, in pretty bundles, on Etsy.
How has your business changed and developed since it started?
We started out with the idea of making felted items to sell. As we worked, the items became adventurous, larger and more decorative, and making felted art was a natural progression from that. Felted art is popular and we received requests, through our blog, for workshops to teach how to make it. Many requests came from abroad so we decided to write a step-by-step guide to making felted art that would be like having a workshop in your own home. We chose to sell the ‘book’ as an instant pdf download to make it quick and easy for customers to receive - no matter where they live.
What are the main ways you promote your business? Which methods have been the most successful for you?
Our blog is our most successful promotion of our business. We believe that if a customer can see some of our work, learn a little about us and perhaps try out our free tutorials, then she will have confidence in our pdf ‘Creating Felt Artwork’.
We’ve written articles for felting, stitching and crafts magazines and there’s always a rush of interest in our blog from those.
We also sell on Etsy and Craftsy.
What’s your workspace like? Can we have a sneak peek? And do you have any workspace organisation tips for the rest of us?
We both have a dedicated craft room in our own homes. The essential bits of kit common to both rooms are: stash, felting/project table, sewing table, computer and desk, camera and good room lighting.
The hardest part of any project is the actual starting, so don’t put essential equipment away.
Set your sewing machine up on its own table so that you just have to sit at it to start sewing. Have your sewing requirements, such as threads, close to hand and neatly organised so that you don’t waste time searching for something.
Set up a dedicated table for ‘work in progress’ so that you don’t have to pack it away and so that you can easily work on your project in even just a few spare minutes. It’s also good to be able to just look at your project from time to time so that while you’re doing other things you can mull over ideas.
Keep a notepad handy and jot down any ideas you have - if you don’t they can just evaporate!
Tidy up and sort your stash now and again, not only because it makes life easier, but also you can forget what you have and sometimes just sorting through it is inspiring.
What other small (or not-so-small) creative businesses do you admire?
Sara's Texture Crafts - Sara always seems happy and enthusiastic about her passion for fibres and offers free advice along with her wares. Her stock is varied, colourful, good quality and fairly priced.
What tips can you give to others who run (or hope to run) a small creative business?
The most important thing is to be passionate about what you do, then it’s as much joy as it is work and far more likely to succeed.
A business needs to make a profit, so calculate all your costs carefully before you decide on a selling price.
Register with HMRC as soon as you start trading and keep accurate records of all money in and all money out - then you need never fear the taxman.
Keep an open mind to different ideas and always be prepared to change direction if necessary.
Set goals. If you want to launch a new product every six months, then you have to work out what steps you will need to do, and when, to accomplish that. Nothing happens if you just have a vague idea of what you want.
What are your hopes, plans or ambitions for the future?
We’d both love to be full-time textile artists.
Finally, where are the places we can find you online if we want to partake in a little friendly cyber stalking?
Please drop in to our blog www.rosiepink.typepad.co.uk where we occasionally talk about what we’re up to and where we share free felting tutorials.
Thanks so much for stopping by – it was so nice to be able to take the time to chat with you!
Thank you for inviting us in Wendy.
Thursday, 11 October 2012
Filing Pockets: A Tutorial
It's taken me ages to get round to this project! Ironically, I think I may have been more organised if I'd already had this made, which would definitely have speeded things up.
My youngest daughter was at my house when the fabric for this arrived and asked what I was making with it. I told her "a filing cabinet". At her surprised look, I said "you think I'm mad, don't you?"
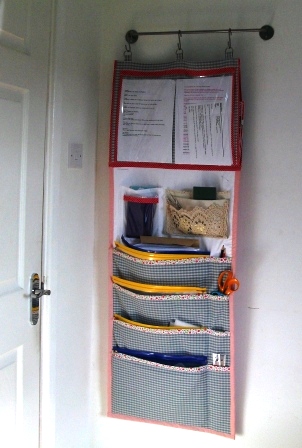
"Mmm, li'l bit" was the reply I got. So, there you are. Mad. But just occasionally, a little bit of madness helps create something that works - and here's my filing "cabinet"...
Actually, there's not much of the cabinet about it and it definitely takes up much less space than an actual cabinet. Filing pockets, rather than filing cabinet. I've started looking at wall space in a whole new light and a few more things along these lines may well be appearing soon!
OK, I started out with:
You can make this filing system to suit yourself - I need to organise the sewing patterns and craft projects I design for craft magazines, because I'm always working to deadlines and I need to know where the rabbit's ears are or the the instructions for the owl pincushion are at any one time.
I also need to remind myself of deadlines, each specific magazine's requirements for how the article is to be written, and my ideas. I already have pens, rulers and notepads everywhere, but another place where they're easily accessible is a help in making me feel organised (even when I'm not really).
I'll give you the measurements I used, because you can see from the photos what fits in them, and you can maybe make it smaller or larger for your own needs. The zipped wallets you can see peeping out measure approx 37cm x 29cm (14" x 11").
Most of the pockets aren't gusseted, because I don't need to stuff huge wads in there. If they were gusseted, I probably would stuff huge wads in there and it would just turn into a wall version of my cupboards, drawers and stash boxes, wrecking my chances at this whole idea of being organised. Oh, I know me so well!! They still fit more than I expected, though.
In this cutting list, I've mentioned the fabric I used to make things clearer and in case you want to make an exact copy! Follow the links above for the fabrics. The red stripe is an old fabric, but there has to be something similar for sale somewhere!
Sew bias binding along the tops of the 4 large pockets. I used a slightly different method to the usual, which makes the most of the lovely print: pin one side of the bias onto the back of the pocket, wrong sides facing. Zigzag in place.
Fold the bias forward and stitch into place using straight stitch.
Iron the interfacing onto the calico backing fabric. Sew the pockets in place on the front of the calico backing fabric. Place the first pocket 38cm from the top edge. Sew around three edges of the pocket.
There's no need to neaten - unless you want to zig zag across the bottom edge of each pocket for strength (or OCD-related reasons!). The seams will all be hidden.
Place subsequent pockets 13cm lower, each pocket overlapping the first, until you've sewn four pockets in place. The bottom pocket should be flush with the bottom of the backing fabric.
Make smaller pockets on the right hand side of each of the big pockets by sewing right down the pockets, and across where the pocket needs to be shorter (I left a long pocket at the bottom for rulers, and the otthers are shorter for pens and scissors).
Don't skip this stage - these pockets are proving really useful to me and I'd guess they might to you too.
Fold the check fabric measuring 50cm x 76cm in half (making a piece 38cm x 50cm) and press. Open out and sew bias along the two long edges. Sew a channel along the folded edge if you plan to hang it on a dowel (I did this then changed my mind and added tabs - these are optional, you can add them now or later).
Sew bias binding in place below the channel (top edge only as shown in above photo) to hold the PVC pocket in place. Fold under both ends, matching the length of the bias to length of PVC.
Sew bias onto the two shorter edges of the PVC, enclosing the raw edge.
Place the PVC pocket in position underneath the bias and stitch along the bottom edge of the bias to secure, holding the top of the PVC pocket in place. The sides of the pocket remain open, not the top.
Stitch bottom of PVC down - this edge will be covered later when you join the top to the bottom and add thr bias to cover both the seam and the bottom of the PVC. You'll also notice there's another side pocket too - the folded piece has created a pocket you can stash magazines or folders in.
Sew a small pocket from PVC - fold over the top of the PVC and cover the raw edge with bias. Hem the white fabric along the top edge. Pop the PVC pocket centrally onto the white fabric and turn over the three raw edges twice (to the front) to form a hem and enclose the PVC all in one, and sew in place close to the fold.
Sew the whole pocket onto the backing close to the edge of the pocket.
If you have one lying around (and I know I'm not the only one who has squirrelled things like this away!) make a pocket from an old traycloth just by folding and stitching into place around three sides.
Back the whole of the main pocketed area with pelmet Vilene and then place centrally on the final backing piece. Turn the edges over to the front twice and press. Sew along the edges to create a hem and binding.
Sew the bottom part of filing pockets to the top part, right side to wrong side (flat). Cover the resulting join on the front with a piece of bias and turn under at the ends. This bias should also enclose the bottom of the large PVC pocket.
If you didn't add tabs before, you can add them now. Place a D-ring in the tab before attaching if required. For my tabs, I used fabric measuring 10cm x 8cm for each tab. I folded in half lengthwise, folded under 1cm on each side and stitched along the length to enclose the raw edges, then attached to the filing pockets with secure stitching.
Fix the dowelling or pole to the wall - mine is an IKEA Bygel rail with Bygel hooks. Bizarrely, this pole has been sitting under my kitchen sink for about three years. It's about time it started earning its keep!
If I had realised I was going to use it, I may have made the channel at the top wider so it could be slid over the end pieces. However, this way it can be easily removed for washing.
Enjoy being organised! Ahem. Maybe.
The fabrics I linked to above were kindly given to me by Abakhan fabrics to use in this tutorial.
My youngest daughter was at my house when the fabric for this arrived and asked what I was making with it. I told her "a filing cabinet". At her surprised look, I said "you think I'm mad, don't you?"
"Mmm, li'l bit" was the reply I got. So, there you are. Mad. But just occasionally, a little bit of madness helps create something that works - and here's my filing "cabinet"...
Actually, there's not much of the cabinet about it and it definitely takes up much less space than an actual cabinet. Filing pockets, rather than filing cabinet. I've started looking at wall space in a whole new light and a few more things along these lines may well be appearing soon!
the big filing pockets are deep and roomy, and the pockets to the side fit scissors, pens and pencils. The narrow bottom pocket is longer than the other narrow pockets and you may be able to see the top of two 12" rulers peeping out?
OK. Let's look a bit closer...
now you can see the tops of the rulers!
OK, I started out with:
- one metre of this blue check fabric from Abakhan - it's a lovely firm, heavy fabric, perfect for pockets without needing any lining.
- one metre of bleached calico - not so heavy but still quite sturdy, perfect for backing the pockets, especially with a little extra help (iron-on Vilene adds a little strength and stability) and for making smaller pockets.
- a metre of this clear PVC - you won't use anywhere near a full metre but it comes in handy for all sorts of projects, so it's a good one to keep in your stash (and it's really cheap!). It's perfect to make pockets for things you want to be able to see at a glance and you can stick post-it notes to the front of it!
- three metres of this gorgeous print bias binding. I didn't have enough (the project got bigger as I went along!) and I added some red spotty bias from my stash. The final count of bias is just over 5 metres.
- I also used pelmet Vilene, iron-on interfacing, D-rings, a bit of fabric that I'd valiantly hung onto for about 20 years and a battered old traycloth. This is one of those projects you can root around in your stash and include whatever you like. I think possibly the pelmet Vilene might really be the most important thing of all because it holds the whole thing flat. However, the iron-on interfacing is optional and really depends on the weight of your backing fabric and your confidence in it!
You can make this filing system to suit yourself - I need to organise the sewing patterns and craft projects I design for craft magazines, because I'm always working to deadlines and I need to know where the rabbit's ears are or the the instructions for the owl pincushion are at any one time.
I also need to remind myself of deadlines, each specific magazine's requirements for how the article is to be written, and my ideas. I already have pens, rulers and notepads everywhere, but another place where they're easily accessible is a help in making me feel organised (even when I'm not really).
I'll give you the measurements I used, because you can see from the photos what fits in them, and you can maybe make it smaller or larger for your own needs. The zipped wallets you can see peeping out measure approx 37cm x 29cm (14" x 11").
Most of the pockets aren't gusseted, because I don't need to stuff huge wads in there. If they were gusseted, I probably would stuff huge wads in there and it would just turn into a wall version of my cupboards, drawers and stash boxes, wrecking my chances at this whole idea of being organised. Oh, I know me so well!! They still fit more than I expected, though.
Instructions:
In this cutting list, I've mentioned the fabric I used to make things clearer and in case you want to make an exact copy! Follow the links above for the fabrics. The red stripe is an old fabric, but there has to be something similar for sale somewhere!
Cut:
- white calico backing fabric 50cm x 100cm
- pelmet Vilene 50cm x 100cm
- iron-on interfacing 50cm x 100cm (optional)
- red stripe: 56cm x 106cm - this one will be used as a fold-over binding too, so it will show around the front edges as well as being the final backing piece showing from behind
- blue check: 4 pockets measuring 50cm x 28cm each
- blue check: 1 piece of fabric measuring 50cm x 76cm (this will be folded in half to make the top piece)
- Cut 1 piece of PVC measuring 45cm x 32cm (this will become the top pocket where you can stash 2 x A4 sheets you want to be able to see at a glance)
- 1 piece of PVC for small pocket: 21cm x 16cm
- white calico for small pocket: 24cm x 22cm
To Make:
Sew bias binding along the tops of the 4 large pockets. I used a slightly different method to the usual, which makes the most of the lovely print: pin one side of the bias onto the back of the pocket, wrong sides facing. Zigzag in place.
Fold the bias forward and stitch into place using straight stitch.
Iron the interfacing onto the calico backing fabric. Sew the pockets in place on the front of the calico backing fabric. Place the first pocket 38cm from the top edge. Sew around three edges of the pocket.
There's no need to neaten - unless you want to zig zag across the bottom edge of each pocket for strength (or OCD-related reasons!). The seams will all be hidden.
Place subsequent pockets 13cm lower, each pocket overlapping the first, until you've sewn four pockets in place. The bottom pocket should be flush with the bottom of the backing fabric.
Make smaller pockets on the right hand side of each of the big pockets by sewing right down the pockets, and across where the pocket needs to be shorter (I left a long pocket at the bottom for rulers, and the otthers are shorter for pens and scissors).
Don't skip this stage - these pockets are proving really useful to me and I'd guess they might to you too.
create the smaller pockets with stitching
the dark dotted lines are the stitching lines
Fold the check fabric measuring 50cm x 76cm in half (making a piece 38cm x 50cm) and press. Open out and sew bias along the two long edges. Sew a channel along the folded edge if you plan to hang it on a dowel (I did this then changed my mind and added tabs - these are optional, you can add them now or later).
Sew bias binding in place below the channel (top edge only as shown in above photo) to hold the PVC pocket in place. Fold under both ends, matching the length of the bias to length of PVC.
Sew bias onto the two shorter edges of the PVC, enclosing the raw edge.
Place the PVC pocket in position underneath the bias and stitch along the bottom edge of the bias to secure, holding the top of the PVC pocket in place. The sides of the pocket remain open, not the top.
Stitch bottom of PVC down - this edge will be covered later when you join the top to the bottom and add thr bias to cover both the seam and the bottom of the PVC. You'll also notice there's another side pocket too - the folded piece has created a pocket you can stash magazines or folders in.
Sew a small pocket from PVC - fold over the top of the PVC and cover the raw edge with bias. Hem the white fabric along the top edge. Pop the PVC pocket centrally onto the white fabric and turn over the three raw edges twice (to the front) to form a hem and enclose the PVC all in one, and sew in place close to the fold.
Sew the whole pocket onto the backing close to the edge of the pocket.
If you have one lying around (and I know I'm not the only one who has squirrelled things like this away!) make a pocket from an old traycloth just by folding and stitching into place around three sides.
Back the whole of the main pocketed area with pelmet Vilene and then place centrally on the final backing piece. Turn the edges over to the front twice and press. Sew along the edges to create a hem and binding.
Sew the bottom part of filing pockets to the top part, right side to wrong side (flat). Cover the resulting join on the front with a piece of bias and turn under at the ends. This bias should also enclose the bottom of the large PVC pocket.
If you didn't add tabs before, you can add them now. Place a D-ring in the tab before attaching if required. For my tabs, I used fabric measuring 10cm x 8cm for each tab. I folded in half lengthwise, folded under 1cm on each side and stitched along the length to enclose the raw edges, then attached to the filing pockets with secure stitching.
Fix the dowelling or pole to the wall - mine is an IKEA Bygel rail with Bygel hooks. Bizarrely, this pole has been sitting under my kitchen sink for about three years. It's about time it started earning its keep!
If I had realised I was going to use it, I may have made the channel at the top wider so it could be slid over the end pieces. However, this way it can be easily removed for washing.
Enjoy being organised! Ahem. Maybe.
The fabrics I linked to above were kindly given to me by Abakhan fabrics to use in this tutorial.
Sunday, 7 October 2012
Handmade Monday 87
Hello and welcome to another Handmade Monday.
This week I've finished off a few things for magazines...
there's a painted papier mache/fabric handbag moneybox winging its way to Craftseller
as well as a set of boxes made using some free craft-themed papers they'll be giving away free with the magazine (I love the cotton reel paper, don't you?):
and I finished off a mail organiser for Sewing World - this envelope pocket is just a tiny part of it:
You know, writing this blog post has made me realise why this week has felt so busy!
In case you missed it, you can find out here about my book giveaway as part of the Make and Craft Blog Tour. I'm really, really pleased with this book - there's some really excellent advice and information within its pages for anyone who sells crafts.
OK, it's time for Handmade Monday!
This week I've finished off a few things for magazines...
there's a painted papier mache/fabric handbag moneybox winging its way to Craftseller
as well as a set of boxes made using some free craft-themed papers they'll be giving away free with the magazine (I love the cotton reel paper, don't you?):
and I finished off a mail organiser for Sewing World - this envelope pocket is just a tiny part of it:
You know, writing this blog post has made me realise why this week has felt so busy!
In case you missed it, you can find out here about my book giveaway as part of the Make and Craft Blog Tour. I'm really, really pleased with this book - there's some really excellent advice and information within its pages for anyone who sells crafts.
OK, it's time for Handmade Monday!
Saturday, 6 October 2012
Make and Craft Blog Tour - and Giveaway!
Welcome if you're following the blog tour and have arrived from Alice's blog - it's been a fascinating tour up to now! And if you've not yet heard of the blog tour, where have you been? Basically, this blog tour is about celebrating the launch of Make and Craft magazine - it's a brand new magazine with subscriptions available from just £1 for 3 digital copies (if you're not in the UK, then I promise you one British pound isn't much in anybody's money and means you can access this magazine easily from anywhere in the world!) and £3 for three print copies.
Let me introduce myself very briefly for those who don't know me: I'm Wendy, I run a small but successful business selling my own hand painted (and usually personalised) plaques, canvases and clocks at 1st Unique Gifts
I write craft articles for magazines, I design sewing patterns and I am writing some e-books on the business side of crafting.
I also have more ideas I haven't started working on yet! Sounding like a juggling act? Yep, it most certainly is, and sometimes, some of those balls do fall down. At the moment, I see the patterns and books as slow-works-in-progress - hopefully I'll get there in the end! I've made a start with patterns on Craftsy and am looking forward to getting more patterns on there soon.
I also write this blog you're reading right now for the handmade community, and love to interview other makers and people involved in the craft world on here - so I was quite excited to be able to interview Katharine Jewitt, editor of the new Make and Craft magazine, right here on this blog - you can read the interview here (it opens in a new tab) - I was fascinated to discover more about Katharine's background and inspiration.
Each of the blogs on the Make and Craft tour is giving away a free book to one reader - and today is your chance to win a copy of The Crafter's Guide to Taking Great Photos by Heidi Adnum.
I am thrilled to be giving away this book for two reasons:
The book includes a lot of nuggets of really valuable information, like:
What I like best about this book is that it doesn't tell you what to do - instead, it tells you which choices might be best for certain circumstances so you can very easily decide what might be best for you and your particular circumstances - this approach makes it an ideal book for anyone on a budget because it shows you how to get good photos with a simple point-and-shoot camera (or even a smartphone) as well as a more expensive camera - it explains quite clearly what your restrictions might be and how you can get around them. It doesn't expect you to go out and buy the latest equipment, but details when and why an investment in new equipment could be a good move for some people.
I think it's one of those must-have books for anyone hoping to sell anything online - in fact, unless you're a professional photographer already, I'm pretty certain you'll learn something from this book. The other bonus is that - of course! - it is beautifully illustrated with gorgeous photos, many of them in themselves offering inspiration and ideas you might be able to adapt.
It's written in easy-to-access layman's language and the few necessary technical terms are explained very simply. Believe me, that matters a heck of a lot to some of us (yeah, my hand is up!) and is one of the (many) reasons I'd recommend that everyone who sells online should own a copy of this book. I promise I'm not just saying that because I want you to enter the giveaway!
Want one of your own?
OK, to enter the giveaway you need to do two very simple things:
The winning name will be drawn at random and I'll let you know the winner here on Tuesday 16th October. Make sure you're contactable via your comment (if it links to a blog, that's ok - I can find you there). I'll send to any UK postal address. Pop back and check here just in case I have problems contacting you for any reason.
And if you're interested in craft books (why wouldn't you be?) you may well be interested in Make and Craft's book club - check it out! It's in its infancy right now, but I think it could get very interesting!
The blog tour continues tomorrow with Sew Scrumptious - make sure you pop over there and see what book is on offer tomorrow, as well as following the rest of the tour. If you missed any previous posts on the tour, you can catch up with them via the links here.
PS: if you're not lucky enough to win this giveaway, I'd recommend putting this book on your Christmas list as it'll give you lots to think about as we start a new year! Send this link to Santa (or just buy it yourself if Santa never seems to get it right - you can ring Search Press on 01892 510850 and get free postage by quoting "Make and Craft Blog Tour" - the ISBN is 978-1-84448-751-6 and the book is £12.99) - or maybe you could go to Search Press and find a few more craft books to add to your list!
Let me introduce myself very briefly for those who don't know me: I'm Wendy, I run a small but successful business selling my own hand painted (and usually personalised) plaques, canvases and clocks at 1st Unique Gifts
sorry about the mess - personalised plaque
I write craft articles for magazines, I design sewing patterns and I am writing some e-books on the business side of crafting.
cosy sofa clock - a recent project
using fabric applique mixed with paint, paper and glue
I also write this blog you're reading right now for the handmade community, and love to interview other makers and people involved in the craft world on here - so I was quite excited to be able to interview Katharine Jewitt, editor of the new Make and Craft magazine, right here on this blog - you can read the interview here (it opens in a new tab) - I was fascinated to discover more about Katharine's background and inspiration.
Each of the blogs on the Make and Craft tour is giving away a free book to one reader - and today is your chance to win a copy of The Crafter's Guide to Taking Great Photos by Heidi Adnum.
I am thrilled to be giving away this book for two reasons:
- it's such a brilliant book and will make a difference to absolutely anyone who sells online (or plans to)
- I get to keep a copy for myself!
The book includes a lot of nuggets of really valuable information, like:
- ways to take better photos even on a budget (it's not all about fancy new cameras)
- how best to utilise light (I thought I knew about making the most of big windows and daylight - but there's so much more to learn about using daylight than that)
- composition and what the type of accessories you include in a "lifestyle" shot might suggest about your product (really interesting!)
- making a light tent, light box or even a tripod for next to nothing (very clever!)
- interviews with crafters who use photography well (but might not always have done, so you see their learning curve) - there are some great tips in the interviews
- how to use Photoshop Elements (looks like a brilliant introduction so I'll definitely be looking at that part of the book much more closely)
- specific advice for specific craft genres
What I like best about this book is that it doesn't tell you what to do - instead, it tells you which choices might be best for certain circumstances so you can very easily decide what might be best for you and your particular circumstances - this approach makes it an ideal book for anyone on a budget because it shows you how to get good photos with a simple point-and-shoot camera (or even a smartphone) as well as a more expensive camera - it explains quite clearly what your restrictions might be and how you can get around them. It doesn't expect you to go out and buy the latest equipment, but details when and why an investment in new equipment could be a good move for some people.
I think it's one of those must-have books for anyone hoping to sell anything online - in fact, unless you're a professional photographer already, I'm pretty certain you'll learn something from this book. The other bonus is that - of course! - it is beautifully illustrated with gorgeous photos, many of them in themselves offering inspiration and ideas you might be able to adapt.
It's written in easy-to-access layman's language and the few necessary technical terms are explained very simply. Believe me, that matters a heck of a lot to some of us (yeah, my hand is up!) and is one of the (many) reasons I'd recommend that everyone who sells online should own a copy of this book. I promise I'm not just saying that because I want you to enter the giveaway!
Want one of your own?
OK, to enter the giveaway you need to do two very simple things:
- leave a comment on this blog (ideally tell me why you'd like to win it, I'd love to know!)
- register on the Make and Craft website
The winning name will be drawn at random and I'll let you know the winner here on Tuesday 16th October. Make sure you're contactable via your comment (if it links to a blog, that's ok - I can find you there). I'll send to any UK postal address. Pop back and check here just in case I have problems contacting you for any reason.
And if you're interested in craft books (why wouldn't you be?) you may well be interested in Make and Craft's book club - check it out! It's in its infancy right now, but I think it could get very interesting!
The blog tour continues tomorrow with Sew Scrumptious - make sure you pop over there and see what book is on offer tomorrow, as well as following the rest of the tour. If you missed any previous posts on the tour, you can catch up with them via the links here.
PS: if you're not lucky enough to win this giveaway, I'd recommend putting this book on your Christmas list as it'll give you lots to think about as we start a new year! Send this link to Santa (or just buy it yourself if Santa never seems to get it right - you can ring Search Press on 01892 510850 and get free postage by quoting "Make and Craft Blog Tour" - the ISBN is 978-1-84448-751-6 and the book is £12.99) - or maybe you could go to Search Press and find a few more craft books to add to your list!
Friday, 5 October 2012
Tea and a Chat with Mike Carthew
I've invited Mike Carthew round for a tea and a chat today. Mike's just co-written a book that might be of great interest to you so get comfy, pour yourself a drink and let's find out more...
Hi Mike! The kettle’s
just boiled – what would you like to drink?
Hi Wendy, a builder’s tea would go down a treat. If you feel
like spoiling me though I’ll go for a Lapsang with hobnobs please.
Tell me a bit about yourself
– what’s your background?
I’m a real mixed bag. My loves in life, apart from my
gorgeous girlfriend, all come from the outdoors. Living down in Cornwall means I
can over-indulge in surfing and walking but I love nothing more than going out
in our little fishing boat to catch mackerel and crabs for dinner.
Professionally I’m an entrepreneur at heart. I currently
work as a Digital Marketing Specialist for a company that supports promising start-up
businesses so it’s a great place to be when you’re full of ideas! I have always
believed that some people just aren’t built to spend their lives working 9-5 in
offices. Today we’re more mobile than ever before - anyone can start a business
or become self-employed with a few basic business skills and an understanding
of how to start-up on little to no budget.
So, I’ve heard you’re
writing a book. What’s it about?
Well it’s about exactly this in relation to creative people.
It’s called ‘Get Paid for Your Passion’. There are so many talented creatives
out there who’d love to generate an income from their skills and passion but
don’t know how to do it effectively. A couple of years ago my partner founded www.TwoRedTrees.co.uk to provide a
platform for talented designer/makers to sell their work. However, it rapidly
became clear that they don’t just need a platform, they need a strategy too.
We’re the generation that was raised to believe we could
make a living doing what we love. Until recently though, for creatives at
least, that was a hard thing to achieve. But we really are entering a new era;
creative people have the tools at their fingertips to access huge audiences and
really connect with people who love their work.
It sounds simple but essentially we’re talking about starting
and running a creative micro-business. Like any business, you have to
absolutely hit the nail on the head if you want to thrive. That means you have
to know your customer like you know your friends, take fantastic product
photos, use the right social media channels in the right way and really analyse
your approach to commercialising your creativity. The crux of the book is that you
can hugely increase your success rates when it comes to selling creations by
developing and evolving a genuine strategy, which fits you and your work.
The further we got into the book the more we realised we
simply didn’t have the expertise to do some of the topics justice, so we went
on a hunt. We’ve got interviews and input from some of the top selling Etsy
creatives in the world, incredible product photographers, illustrators who have
shipped 5000 prints in 48 hours, world leading social media specialists and
many more. It completely snowballed and ended up going from a mini-project to a
whole book jam-packed with really clear advice from people who speak from
hard-earned experience. The thing that amazed me was just how much helpful
advice these successful people can offer the wider creative community.
Essentially, if you are serious about making money from your
creative passion then this book is tailor made for you!
What made you want to
write a book?
Well I must say the desire came from genuine empathy.
Running Two Red Trees with my partner puts us in contact with so many
incredibly talented people who’d love to be making a full time living from
their passion. I know how hard it is to have the things you love take a back
seat to 9-5 working life and I just don’t think it needs to be like that for
everyone. Many creatives produce work which people out there would be happy to
pay for. We wanted to help them find this audience and set the selling wheels
in motion.
Is your book aimed mainly
at the UK or American market?
‘Get Paid for Your Passion’ is for anyone creative looking
to sell work more effectively. This said we’re from the UK so all the financial
advice such as how to price work and cost overheads are in pounds sterling.
There’s also some UK specific advice on how to set up your taxes the Managing
Director of an accountancy firm who is also a creative herself. International
readers can just skip these UK-specific pages – the real value is in the
approach and the principles apply to any currency.
Why do you think so
many creative people struggle with the business side of selling their creations?
To flip the question on its head, why would they be
business-minded in the first place? Like any new skill-set, developing a
business-savvy approach takes practice. It’s a whole new outlook which creative
people often have little to no exposure to. The unexpected thing is it can be
really rewarding and fun. For example we talk readers through customer
profiling – who are their target audience? What magazines do they read? What
words and lingo do they use to describe things? You can build a complete
picture of your customers to help steer your creativity and how/where you sell
your creations. I think overall it’s easy to see the business side of things as
a dark art. Put simply, we just want to flick the lights on!
When and where can we get our
hands on a copy of your book?
Very soon! The book will be released on Amazon in November
and the downloadable e-book will be available on our website Commercial Creatives. If
you want a reminder then drop me an email through the website and I’ll add you
to the mailing list.
Is there anywhere we
can go to find out more?
The website
has some great preview material including 4 free chapters. These include one on
the journey the book will lead you through and another on how to steer your
creativity towards more profitable markets whilst staying true to your own
style. We’re so new we’ve only just set up our Facebook page - like it to stay up to date with the book!
We’re seriously excited about releasing it and based on some
of the feedback I’ve had recently I think it could prove to be a real
game-changer for creatives who want to make money from their passion!
Thanks so much for
popping in – it was lovely to chat with you.
You too Wendy, it would be great to stay in touch and of
course we’re here if any of your readers have questions for us.
Keep reading this blog for details of how to win a copy of Get Paid for your Passion!
Subscribe to:
Posts (Atom)