

This sewing kit can sit on your knee in the tightest of spots (think bus or train seats) and can even act as a little tiny desk for small sewing tasks! I'm now thinking it needs a companion A5 box for stashing small projects. What a perfect on-the-road kit that pair would make!

This dinky little sewing case folds easily and neatly back to an A5 size when your journey's ended (or you've finished your sewing).

It's really easy to make, so I've put together a quick tutorial for you. There are lots of steps, but each one only takes a minute or two and they're all easy and pretty much interchangeable - make this kit to suit you and your sewing preferences.
This is what you'll need:
- old diary or hardback book (I used A5 size, which is probably a good size for popping in your handbag)
- fabric to cover - you won't need much & might be able to cut up an old shirt
- wadding or padding - I used a bit of old blanket fleece
- old jeans for inside (or other fabric)
- felt scraps
- small length of ribbon
- buttons and/or beads
- velcro (optional)
- an elastic hair bobble/scrunchie
- embroidery thread
- toy stuffing (don't buy it specially - a bit of wadding/fleece/soft fabric will do)
Tools you'll need:
- glue gun
- craft knife
- sewing machine and basic sewing tools (for hand and machine sewing)
- a matchstick (I used one of those big long, thicker-than-average ones for cooking)
To add to the sewing kit when it's finished, you'll need:
- small pair of scissors
- seam ripper
- pins and needles
- small bobbins of thread (optional)
- embroidery threads (optional)
Instructions:
First, take your old diary or (horrors!) hard back book. Be sure to pick one that's very unloved, because the next stage is slashing the pages out!
After you've got rid of the pages, you'll need some fabric for the outside, as well as wadding (batting) or fleece. I used two layers of fleece for the padding, which worked well and came from an old blanket.
Measure around the edge of the book - flatten the book out, especially along the spine, and cut out a rectangle of fabric, leaving about 1.5" or 2" all the way round the book edges for folding around the edges.

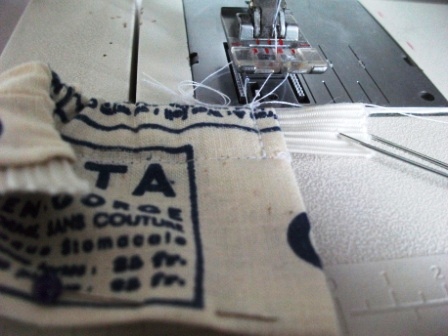
Cut out wadding or fleece by drawing around the book and cutting inside the lines you've drawn. Same again for the lining fabric (old jeans). You want the fleece fabric and denim lining to be just a little smaller than the book.
Cut the fleece/wadding fabric in half and trim to fit just inside both covers of the book, leaving the spine uncovered.
Place the wadding on the book and use only a few small dabs of glue from the glue gun to position.


Again, use small dabs of glue to postition - you'll spoil the fabric with too much glue (and you'll make it really hard on yourself later as you'll need to hand sew around here!).

Take care that the fabric isn't stretched too tightly over the spine - the "book" still needs to close. If you want to stitch the mitred corners to neaten, you can do - just use a small slip stich - but it's optional.

the photos above and below show the difference between sewing and not sewing those corners - these are before and after shots!

Put the cover to one side now while we concentrate on making the inside.
Making the inside:
Take the piece of jeans fabric, or whatever you've chosen for your lining, and cut it just inside the line you drew earlier (all around the flattened diary/book).Fold under (about 1/2") and press.
Place to one side, but keep it handy so you can decide where all the pockets will be going.
Making the pockets etc:
Sizes for all these pockets are not crucial, apart from the scissors case and the pocket for the seam ripper - you need your items to fit inside them so you can make them to measure.The main thing is to check that all the pockets work together and fit - if they don't, then make them smaller or move them about. The type of sewing you're likely to do on the move might dictate what type of pockets you want.
1. Needlecase

Make a cover for the needlecase from 2 layers of fabric, stitched together with some wadding/fleece between the layers. I topstitched mine.

Pin the folds of felt behind the cover, and pin it under a piece of ribbon which reaches all the way across your lining fabric and tuckes under the ends.Machine sew it in place, making sure you catch all layers.

2. Pincushion

Sew the two pieces of felt together along three sides.

Stuff and then sew up the last side.

I added a button, too, because it just looked too plain without!

3. Pocket with elastic

Secure at ends with stitching.
Turn edges under. Pin into place on the lining, pleating along the bottom edge.

4. Pocket pouch

and you can ease the bottom edge to make the pocket stand out slightly at the top.

5. Pocket for scissors

Also cut another piece the same width but smaller - keep this one rectangular as it will be the flap which will hold the scissors in place.
Cut lining fabrics for both pieces (same size). Sew, right sides together, leaving a gap for turning (the gap should be at the top of the flap and the side of the pouch as seen below). Trim the corners, and trim the thicker fabric close to the seams to eliminate bulk.


Turn to right sides, press and sew pouch into place close to the seams.

Pin in position and sew down. You can see from this photo (below) that I used a piece of fabric to sew across the top of the flap. This means I didn't need to do anything with the opening I used for turning the flap. I did topstitch the flap, close to the edge, before pinning into place.

If you're careful, you might also be able to sew down the scissors pocket without needing to handsew the opening you used for turning.

You'll finish up with a nice neat pocket and the flap will hold the scissors in place very nicely, even without the need for a button.
I added a little flower bead to pretty it up!
7. Pocket for seam ripper
8. Cover for pocket - optional

Once all the pockets are attached to the lining, you can stitch the inside to the outside. Place the lining fabric centrally, making sure it fits snugly into the spine and the edges are folded under. Pin and slip stitch into place (if you were too heavy handed with the glue, this will be difficult!).

9. Add a button to the outside
I sewed a couple of pieces of fabric together

sewed the button onto it using embroidery thread

and (curiously perhaps!) a matchstick to create a shank

by wrapping the thread around itself once the matchstick was removed

This meant the button stands proud so the elastic can be wrapped round it easily.
Sew the button through the fabric onto the front of the book.

I sewed it on backwards, with a knot at the front. Not only does this add a bit of character, it makes the sewing easier too, as you're sewing onto a rigid surface.

The elastic I used was just a simple hair bobble/elastic thingimajig/whatever-they're-called-in-your-part-of-the-world. I sewed it into place with embroidery thread and a close blanket stitch, which covered the metal part quite neatly.

And there you have it!

Ready for action!

You'll have to book a long train journey now, just to enjoy some travel sewing! Sure beats gazing out of the window in some of the more built-up parts of the country.

P.S. If you first saw me talking about upcycling this diary here, did you guess what it was going to be?

If you want to print this tutorial off, it's now available as a free PDF download here - just click the button.

23 comments:
This is so genius - I've got to make one!!!! I'd like to link back to this, if I may, for the "Friday Find" I do on my facebook page each week.
Thanks Whitney-Anne - I'd love you to link back to it. Hope you have as much fun making yours as I did mine! x
Wendy I love it!
There's no way I can make it but you never know, one day!
I promise you it's easier than it looks!
Hi Wendy, thanks for leaving such a lovely comment on my blog :) This is a fantastic tutorial. I have bookmarked it and will definitely be giving it a go! Maybe incorporate some little birdies in mine :) xx
You're welcome - I like the idea of the addition of little birdies! x
Hi Wendy,
I have just found your blog and this tutorial is ace. Would you mind if I pinned it on my Pinterest account?
I would love to give this go, but I am not that good at sewing, but I think it would be worth all the stabbed fingers lol
Lisa x
Hi Lisa, yes, please pin anything you like! I'm more than happy for you to spread the word, as long as it links back here.
A word re stabbed fingers: if you use denim for the inner it's a lovely, tough finish but handsewing it in is hard on the fingers!
Thanks x
Great tutorial Wendy and great idea to have it as a download too. Very handy thing to make! Michx
This is so wonderful, I have saved the page and I think I have to make one for ME! Thank you! :)
This is so amazing and complex! I love how you took care of all the details!
Clever idea. Very useful for travelling.
Love it! Great idea... but now I want some of the licorice! Ai, ai, ai...
As a person who goes away most weekends to my BF's, this is a great idea for me to take. I always forget something when I go. I am also a diary nut, so although I may not cut up a diary, I may buy an old book at the charity shop, and use that.! Great thanks. I found you from a link on Pennibs homepage. Thanks!
brava, oggetto molto bello ed originale. complimenti.
Cudos for making the cover of Sewing World. That's a neat little kit to have around.
What a great idea!!! Thank you!!! :o)
Lovely clear tutorial. I keep meaning to make myself a neat travel kit, maybe it's time!
I'm a beginnersewerand have been following you.Is there a pattern for this project. You always give simple directions. Thank you for all you do.
I’ve made about four of these some of my make out of old embroidered Works that I find at the op shop. I have four more cut out ready to go. I wish I could share a photo. I love this pattern.
It took me awhile to work it out not that it was hard it’s just planning has to be done
I wrote the above comment. I wish I could share a photo or two.
Post a Comment